Installation:
|
1. The substrate must be even, clean, and load bearing.
NOTE: Please refer to the 2008 Tile Council of North
America (TCNA) Handbook for Ceramic Tile Installation
for details.
The Blanke PERMAT will not correct for substrate
and installation deficiencies including but not limited
to the following:
structurally unsound substrates;
substrates with surfaces not suitable for the particular installation
including but not limited to those that are not
flat or prepared according to the recommendations of the
TCA and the setting material manufacturer; wood based
substrates swollen, deformed or weakened by excessive
exposure to moisture; and substrates that are improperly
installed.
|
2. The type of thinset mortar used to apply Blanke PERMAT must be appropriate for the substrate in accordance to the manufacturer’s recommendations.
The mortar must both bond to the substrate and mechanically anchor the fleece on the underside of the Blanke PERMAT to the substrate. |

|
|
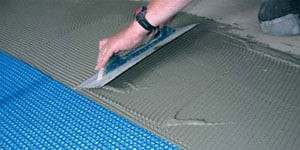
3. Mix the thinset mortar to a slightly more liquid than normal consistency so that the thinset can be absorbed into the fabric on the underside of the mat.
Apply the mortar to the substrate using a 1/4” x 1/4” notched trowel.
The direction in which the mortar is combed does not affect the adhesion or function of the Blanke PERMAT. |
4. Cut sections from the Blanke PERMAT to fit the area to be installed. The panels have a glass fiber mesh overhang of approximately 3 cm (1 3/16”) on two adjoining sides.
This overhang needs to overlap adjacent panels at the seams. It is recommended to cut off completely the overhang from the first panel (to be laid in a corner of the installation area).
By following this method, the other panels can be easily placed so the mesh overhang covers the sides of adjacent panels that do not have the overhang.
Abut the base of the panels tight to the adjacent panel thereby eliminating any gaps between panels. Place the panels in a row top to bottom or left to right. Place the second and subsequent rows of panels so that the seams running perpendicular to the previous row are offset by a minimum of 3 inches from the seams running in the same direction in the prior row. The Blanke PERMAT as with the tile should be gapped 1/4" hwere it abuts vertical surfaces, thresholds and different floor surfaces including wood.
5. Embed the fleece underside of panel into the mortar so that its entire surface is bonded. Use a float, screed trowel, or vinyl roller to press the Blanke PERMAT into the mortar.

6. Immediately after the Blanke PERMAT is installed, the tiles can be set using the thin-bed method.
Use a thinset mortar as recommend for the application by the thinset manufacturer.
Use the flatside of a trowel to work the thinset mortar into the voids on the surface of the panel.
Immediately apply a layer of mortar to the area using a notched trowel that is appropriate for the tile type and format. Solidly embed the tiles in the setting material, making sure to achieve full coverage.
7. Blanke PERMAT does not eliminate the need for movement joints in the tiled surface.
Movement joints should be installed where specified and in accordance with industry standards and norms. (We suggest using the Blanke Heavy Duty Expansion Joints for this purpose).
The Blanke PERMAT must be separated at expansion joints in the substrate but not at control joints. However, movement joints do need to be installed in the tile covering above the mat per industry standards and TCNA guidelines.
UNI-Mat PRO Installation Notes:
The Blanke PERMAT is an innovative uncoupling underlayment that offers all the labor saving benefits of the old plastic roll systems.
The Blanke PERMAT also adds support to wood substrates thereby reducing deflection and provides greater compression and tensile strength than plastic roll products. The Blanke PERMAT is stable to walk on during installation and does not require additional curing time when installing porcelain with latex modified thinset.
Blanke Corporation