www.flooringsupplyshop.com Flooring Supply Store


Quick Pitch®

Shower Slope


GOOF PROOF SHOWER FLOORS

Shower floor drainage, drainage kit, shower floor drainage kit, quick pitch, shower stall, shower floor, shower base, shower slope, Pre slope, shower drain, tile ready shower pan, fiberglass shower pans, shower drain, corner, shower shelves, shower shelves, shower recessed shelves

How to Install Quick Pitch

Quick Pitch perfect Slope by flooringsupplyshop.com

3 AVAILABLE KITS

Part No. QPK101 - Standard Installation Kit

Contents:

a) 1 - Center Ring
b) 6 - Float Sticks (1” to 1 3/4” x 36”)
c) 1 - Installation Instruction Sheet

Part No. EFS103 - Extended Float Stick Kit

Contents:

a) 8 - Extended Float Sticks (1 3/4” to 2 1/2” x 36”)
b) 1 - Installation Instruction Sheet

Part No. XFS101.2 - Extra Float Stick Kit

Contents:

a) 9 - Extra Float Sticks (1” to 1 3/4” x 36”)
b) 1 - Installation Instruction Sheet


Preparation Overview — Quick Pitch, properly installed,
will ensure a minimum drainage slope of 1/4” fall in elevation per 12” run.
The Quick Pitch center ring and float sticks are designed to stay in the floor providing reinforcement to the mud bed.
Quick Pitch also allows the drain riser to be adjusted up and down to compensate for the different thicknesses of tiles and to allow for removal at any time to clear any blockage.
Our Quick Pitch Standard Installation Kit® is designed for an approximate 36” x 60” area with the drain positioned in the center.
Our Quick Pitch Extended Float Stick Kit® is designed for those elongated or irregularly shaped installations where the distance from the drain to walls and corners exceed 36”.
Before you start your installation, be sure that the drain flange, pan or liner and sub-flooring meet with all building and plumbing codes.
Using our easy to follow Five Easy Steps, one will quickly and easily achieve their desired results.
The tools and materials required for a successful Quick Pitch installation are as follows:

  1. Shovel (used to mix mud and deposit on floor).

  2. Trowel (used to pack down mud).

  3. Screed Stick (used to spread and even-out mud — 1” x 2” x 35” wood board should be fine).

  4. Mixing container (5 gal. pail or wheelbarrow to mix mud and transport to shower pan)

  5. Sponge (approx. 2” x 4” x 6” utility sponge to sprinkle
    water over mixed mud in final step).

  6. Water container (2 gal. or 5 gal. pail will work well).

  7. Hacksaw (Float sticks cut easily, if needed).

  8. Mud (a mixture of cement and sand. Premixes are readily available in most home centers and tile supply stores).


Five Easy Steps for Installation:

Quick Pitch perfect Slope by flooringsupplyshop.com

1) Unscrew threaded drain riser and position center ring on top of flange adaptor bolts with the float stick socket openings pointing UP. Be sure the drain is level.

Note: The center ring is designed to sit on top of the flange
adaptor bolts. This clearance adds 1/2" in height to conform to the 1 1/2" minimum mortar bed requirement, allows for the prepitch, and provides optimum efficiency for moisture to pass through to weep holes.

Weep hole protectors are recommended.


Quick Pitch perfect Slope by flooringsupplyshop.com

2) Preposition float sticks. Insert the male tab on narrow end of float stick into the selected female socket of the center ring so that the tops of float stick and center ring are flush. It is desirable for the float stick end furthest from the center ring to be approximately 2 - 2 1/2 ft. from adjacent float stick end.

Add extra or extended float sticks as needed. Cut sticks to desired length.

Reinstall drain riser into drain flange adaptor to hold the center ring and float sticks in place.

Cover drain holes in cover plate with masking tape to keep drain clean during balance of installation. (Note: If a level line, where wall and shower floor meet, or a greater pitch is desired, sticks may be shimmed.

Pack mud under sticks to shim to desired height. It is not desirable or necessary for sticks to fit tightly into corners or against a wall.

Do not fit sticks so tight as to puncture or putpressure on pan.)

Quick Pitch perfect Slope by flooringsupplyshop.com

3) Mix the dry ingredients of your mud (1 part Portland cement and 4 parts sand) with your shovel or trowel. Add enough water to the dry admix (or premix) to bring this floor floating material to the consistency of a compact snowball.

This consistency will allow the material to be easily distributed, troweled, and tamped.

Quick Pitch perfect Slope by flooringsupplyshop.com

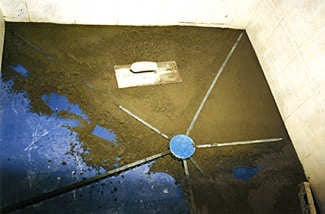
4) Starting with the area farthest from your exit, spread your moistened admix one section at a time.

Slightly over-fill the section and spread the mud with your trowel or screed stick by dragging it along the top surface of the float sticks.

Tamp or lightly compact the mud with your trowel.

5) After tamping and compacting, use your sponge to sprinkle water (approximately 1/2 gal.) over entire surface

LET DRY OVERNITE
Use latex-modified dry set mortar for your tile installation

We at www.flooringsupplyshop.com thank you for your purchase of Quick Pitch® and are confident you will be pleased with its performance.


Links about Quick Pitch System

How to Install Pre Pitch System - How to Install Quick Pitch System - Quick Pitch Specifications - How to Install Kirb Perfect - StringA Level - 9in1 Installation Instruction

Quick Pitch System Video's Links - English

Quick Pitch System Video's Links - Espanol

This page was created by FlooringSupplyShop you may view it for personal use only,
and for flooringsupplyshop.com customers only. DO NOT copy for commercial use. copyright material of www.flooringsupplyshop.com & International Flooring Center, inc.